
Blog
How to Install a Dimmer Switch for Better Lighting

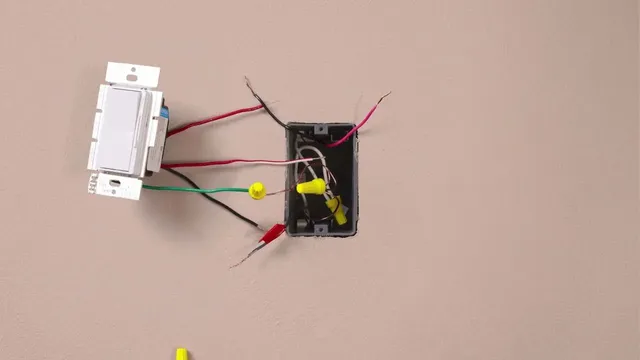
How to Install a Dimmer Switch for Better Lighting (DIY Guide)
Dimmer switches are a simple way to transform the mood and functionality of a room. They let you adjust the brightness of your lights to create a cozy ambiance, save energy, or reduce glare on screens. The good news is that installing a dimmer switch is a straightforward DIY project, even if you’ve never done electrical work before—as long as you follow safety precautions.
Why Install a Dimmer Switch?
Dimmer switches aren’t just about setting the mood. They also:
- Reduce energy consumption and extend the life of bulbs
- Give you better control over lighting in multi-use spaces
- Help protect your eyes from harsh lighting
- Add a modern touch to your home’s electrical setup
Tools and Materials You’ll Need
- Dimmer switch (make sure it’s compatible with your bulb type—LED, incandescent, or CFL)
- Screwdrivers (flathead and Phillips)
- Voltage tester
- Wire stripper/cutter
- Electrical tape
- Wire nuts (usually included with the dimmer switch)
- Safety gloves (optional)
Step 1: Turn Off the Power
Before touching any wires, turn off the circuit breaker that powers the switch you’ll be replacing. Test the switch with a voltage tester to ensure there’s no electricity flowing. Safety is the number one priority.
Step 2: Remove the Existing Switch
Unscrew the switch cover plate and remove the screws holding the switch in place. Carefully pull the switch out of the wall box, keeping the wires connected for now.
Take note of how the wires are attached or take a photo for reference. Most standard switches have two black wires (hot) and a green or bare copper wire (ground).
Step 3: Identify Your Wires
Dimmer switches usually have three wires:
- Black or red wire: line (power from the breaker)
- Black or red wire: load (to the light fixture)
- Green or bare copper: ground
Double-check your existing switch to identify which wire is which. This ensures proper installation.
Step 4: Connect the Dimmer Switch
Here’s the simple way to do it:
- Connect the line wire from your wall to one of the dimmer’s wires using a wire nut.
- Connect the load wire from your wall to the other dimmer wire.
- Attach the ground wire from your wall to the green or bare copper wire on the dimmer.
Once connected, wrap each wire nut with electrical tape for extra safety, and gently push the wires into the wall box.
Step 5: Mount the Dimmer Switch
Screw the dimmer switch into the wall box and attach the cover plate. Make sure the switch is level and secure.
Step 6: Restore Power and Test
Go back to the breaker and turn the circuit back on. Test your dimmer by sliding or turning the switch. The light should smoothly adjust from low to high. If it flickers or doesn’t work, turn off the breaker and double-check the wiring connections.
Tips for a Smooth Installation
- Always check that your dimmer is compatible with your bulb type (LEDs need an LED-compatible dimmer).
- Don’t overload the dimmer—check the wattage rating and ensure your total bulbs don’t exceed it.
- If replacing a three-way switch (controlling the same light from two locations), make sure you purchase a dimmer that supports three-way wiring.
- Keep wires neat in the wall box to avoid pinching when mounting the switch.
Common Mistakes to Avoid
- Not turning off the breaker before starting work.
- Mixing up line and load wires—this can prevent the dimmer from working.
- Using the wrong dimmer for your bulb type.
- Over-tightening screws, which can crack the switch or wall plate.
When to Call a Professional
Most homeowners can install a single-pole dimmer switch safely, but contact an electrician if:
- You’re replacing a three-way switch without experience.
- The wiring looks damaged or old.
- The dimmer still flickers or doesn’t function after installation.
Final Thoughts
Installing a dimmer switch is a simple upgrade that can dramatically improve the lighting and ambiance of any room. With a bit of patience, the right tools, and careful attention to safety, you can complete this project yourself in less than an hour.
Dimmer switches aren’t just about aesthetics—they save energy, protect your bulbs, and give you better control over your home’s lighting. If you ever feel unsure about handling electrical wiring, professional services like HandyMaldives can help ensure a safe and reliable installation.